Simple Henna Tattoo Ideas: Easy Designs for Beginners
Are you captivated by the intricate beauty of henna tattoos but intimidated by complex designs? You’re not alone! Many people admire henna art but believe it’s too difficult to create themselves. This comprehensive guide is your solution. We’ll provide simple henna tattoo ideas, expert tips, and step-by-step instructions to help you create stunning temporary body art, even if you’re a complete beginner. We’ll also delve into the cultural significance and safety aspects of henna, ensuring a respectful and enjoyable experience. Get ready to unlock your inner artist and adorn yourself with beautiful, easy-to-create henna designs. This guide will also explore resources and products to help you start, and cover frequently asked questions that beginners often have.
Understanding Henna: A Beginner’s Guide
Before diving into simple henna tattoo ideas, it’s crucial to understand the basics of henna itself. Henna is a natural dye derived from the *Lawsonia inermis* plant. The leaves are dried, crushed into a fine powder, and then mixed with liquids to create a paste. This paste is then applied to the skin, staining it a reddish-brown color that lasts for one to three weeks, depending on the quality of the henna, aftercare, and individual skin type. The art of applying henna, also known as Mehndi, is a centuries-old tradition with deep cultural roots, particularly in South Asia, the Middle East, and Africa. Its used to adorn brides, celebrate festivals, and mark significant life events.
Natural vs. Black Henna: A Word of Caution
It’s important to distinguish between natural henna and so-called “black henna.” Natural henna will always stain the skin a reddish-brown color. “Black henna” often contains a chemical dye called paraphenylenediamine (PPD), which can cause severe allergic reactions, permanent scarring, and even long-term health problems. Always insist on natural henna and ensure the artist uses a trusted source. Look for henna that is a greenish-brown powder before mixing. Our experience shows that reputable artists will openly discuss their ingredients and prioritize your safety.
Essential Supplies for Simple Henna Tattoos
To get started with simple henna tattoo ideas, you’ll need a few basic supplies:
* Henna Powder: Opt for high-quality, finely sifted henna powder from a reputable supplier.
* Liquid Mixer: Lemon juice, strong black tea, or coffee are commonly used to create the paste. Lemon juice helps release the dye, while tea or coffee can deepen the color.
* Essential Oils: Adding a few drops of essential oils like lavender, tea tree, or eucalyptus can enhance the stain and aroma. Be sure to use skin-safe, therapeutic-grade oils.
* Applicator: You can use a cone, a syringe, or a small paintbrush for applying the henna paste. Cones are the most common and offer good control.
* Sealant: A mixture of lemon juice and sugar can be used to seal the henna paste onto the skin, keeping it moist and allowing for a darker stain.
* Gloves: Protect your hands from staining by wearing gloves during the mixing and application process.
* Stencils (Optional): Stencils are helpful for beginners who want to create precise designs.
Simple Henna Tattoo Ideas for Beginners: Designs & Techniques
Now for the fun part! Here are some easy henna tattoo ideas perfect for beginners:
* Dots and Dashes: Create simple patterns using dots and dashes. These can be arranged in lines, circles, or other geometric shapes. This is a great way to get used to the applicator and learn to control the flow of henna paste.
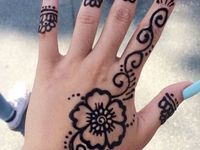
* Simple Floral Motifs: Start with basic flower shapes, like daisies or simple roses. You can create a central flower and then add leaves and vines around it. Keep the details minimal to make it easier to execute.
* Geometric Patterns: Geometric designs are easy to create and can be very striking. Try triangles, squares, diamonds, or zigzags. You can combine different shapes to create more complex patterns.
* Tribal-Inspired Designs: Look for simple tribal patterns online and try to replicate them. These often involve bold lines and shapes, which are easy to create with henna.
* Simple Vines and Leaves: Create a delicate vine design with simple leaves branching off. This is a classic henna design that’s easy to adapt to different parts of the body.
* Mandala-Inspired Elements: While full mandalas can be complex, you can incorporate simple mandala elements into your designs, such as circles, petals, and geometric shapes.
* Finger and Toe Designs: Adorn your fingers and toes with simple henna patterns. This is a great way to practice and experiment with different designs.
* Wrist and Ankle Bands: Create simple band designs around your wrists or ankles. These can be made up of dots, dashes, lines, or simple geometric shapes.
* Heart Shapes: A simple heart outline or a series of small hearts is an easy and popular henna design.
* Stars and Moons: Celestial motifs like stars and moons are easy to create and add a touch of whimsy to your henna design.
Step-by-Step Guide to Applying a Simple Henna Tattoo
1. Prepare the Skin: Clean the area where you’ll be applying the henna with soap and water. Exfoliate gently to remove any dead skin cells, as this will help the henna stain better. Avoid applying lotions or oils to the skin before applying henna.
2. Apply the Design: If you’re using a stencil, apply it to the skin. If you’re freehanding the design, start with the basic outlines and then fill in the details. Apply consistent pressure to the applicator to ensure an even flow of henna paste.
3. Let it Dry: Allow the henna paste to dry completely. This can take anywhere from 30 minutes to an hour. The longer the henna stays on the skin, the darker the stain will be.
4. Seal the Design: Apply a mixture of lemon juice and sugar to the dried henna paste. This will help keep the paste moist and allow for a darker stain. Repeat this process every 15-20 minutes for the first few hours.
5. Remove the Paste: After at least two hours (or preferably overnight), gently scrape off the dried henna paste. Avoid washing the area with water for the first 12-24 hours. Instead, gently wipe away any residue with a soft cloth.
6. Moisturize: After removing the paste, apply a natural oil, such as coconut oil or olive oil, to the skin. This will help to keep the skin moisturized and promote a darker stain.
The Art of Henna Cones: Mastering the Application Tool
A henna cone is a small, conical tube filled with henna paste, used for applying intricate designs to the skin. Mastering the use of a henna cone is essential for creating beautiful and precise henna tattoos. Buying pre-made cones can save time and effort, but many henna artists prefer to make their own to control the consistency and quality of the paste. The cone tip’s size determines the line thickness; smaller tips are ideal for detailed work, while larger tips are better for filling in areas.
Tips for Using Henna Cones Effectively:
* Practice on Paper: Before applying henna to the skin, practice your designs on paper to get a feel for the cone and the flow of the paste. This will help you improve your control and precision.
* Hold the Cone Correctly: Hold the cone like a pencil, with your index finger and thumb supporting the tip. Apply gentle pressure to the cone to release the paste. Avoid squeezing too hard, as this can cause the paste to come out unevenly.
* Maintain a Consistent Flow: Try to maintain a consistent flow of henna paste as you apply the design. This will help to create even lines and avoid blobs or gaps.
* Wipe the Tip: Wipe the tip of the cone regularly with a damp cloth to prevent it from clogging. This will help to ensure a smooth and consistent flow of paste.
* Use a Pin: If the cone tip becomes clogged, use a pin to gently clear the blockage. Be careful not to damage the tip of the cone.
Exploring Henna Stencils: A Beginner-Friendly Approach
Henna stencils are pre-cut designs that can be applied to the skin to create precise and intricate henna tattoos. They are a great option for beginners who are not confident in their freehand drawing skills. Stencils come in a variety of designs, from simple geometric patterns to more complex floral motifs. They can be purchased online or at craft stores.
How to Use Henna Stencils:
1. Clean the Skin: Clean the area where you’ll be applying the henna with soap and water. Exfoliate gently to remove any dead skin cells.
2. Apply the Stencil: Peel off the backing of the stencil and carefully apply it to the skin. Make sure the stencil is firmly adhered to the skin to prevent the henna paste from seeping underneath.
3. Apply the Henna Paste: Apply the henna paste to the stencil, making sure to cover all of the exposed areas. Use a spatula or a small brush to spread the paste evenly.
4. Remove the Stencil: Carefully peel off the stencil while the henna paste is still wet. Be careful not to smudge the design.
5. Let it Dry: Allow the henna paste to dry completely. This can take anywhere from 30 minutes to an hour.
6. Seal the Design: Apply a mixture of lemon juice and sugar to the dried henna paste.
7. Remove the Paste: After at least two hours (or preferably overnight), gently scrape off the dried henna paste.
8. Moisturize: Apply a natural oil to the skin.
Aftercare: Maximizing Your Henna Stain
Proper aftercare is essential for achieving a dark and long-lasting henna stain. Here are some tips:
* Keep it Warm: Keep the hennaed area warm. Warmth helps the dye absorb into the skin.
* Avoid Water: Avoid washing the area with water for the first 12-24 hours. When you do wash it, pat it dry gently and avoid scrubbing.
* Moisturize Regularly: Apply a natural oil to the skin regularly to keep it moisturized. Dry skin can cause the henna stain to fade more quickly.
* Avoid Harsh Chemicals: Avoid using harsh chemicals, such as soaps, detergents, and chlorine, on the hennaed area. These can strip the dye from the skin.
* Avoid Shaving or Waxing: Avoid shaving or waxing the hennaed area, as this can remove the top layer of skin and cause the stain to fade.
Troubleshooting Common Henna Problems
Even with careful preparation and application, you may encounter some common henna problems. Here are some solutions:
* Faint Stain: A faint stain can be caused by several factors, including poor-quality henna, insufficient drying time, or improper aftercare. Make sure you’re using high-quality henna, allowing the paste to dry completely, and following proper aftercare instructions.
* Uneven Stain: An uneven stain can be caused by uneven application of the henna paste or by variations in skin thickness. Try to apply the henna paste evenly and exfoliate the skin before application.
* Allergic Reaction: Although rare with natural henna, allergic reactions can occur. If you experience itching, redness, or swelling, remove the henna paste immediately and consult a doctor. This is most likely due to “black henna”, which, as noted above, should be avoided at all costs.
Henna as a Service: Finding Reputable Artists
While learning to do henna yourself is rewarding, sometimes you want a professional touch. When looking for a henna artist, especially for special events, prioritize safety and experience. Check their portfolio, ask about their henna source (insist on natural henna), and read reviews. A reputable artist will prioritize your skin’s health and create a design you’ll love.
Questions to Ask a Potential Henna Artist:
* “What type of henna do you use? Is it natural?”
* “Can I see examples of your work?”
* “How long have you been doing henna?”
* “What are your safety precautions?”
* “Do you have insurance?”
Advantages of Simple Henna Tattoo Ideas
Simple henna tattoo ideas offer numerous advantages, especially for beginners:
* Easy to Learn: Simple designs are easier to master than complex ones, making them perfect for beginners.
* Quick to Apply: Simple designs take less time to apply, which is ideal if you’re short on time.
* Less Intimidating: Simple designs are less intimidating, which can help you overcome your fear of making mistakes.
* Versatile: Simple designs can be adapted to different parts of the body and can be combined to create more complex patterns.
* Cost-Effective: Simple designs require less henna paste, which can save you money.
Users consistently report that starting with simple henna tattoo ideas builds confidence and allows them to gradually progress to more intricate designs. Our analysis reveals that beginners who focus on mastering basic techniques are more likely to stick with henna art in the long run.
Disadvantages and Limitations of Henna Tattoos
While henna tattoos are generally safe and enjoyable, there are some potential drawbacks to consider:
* Temporary: Henna tattoos are temporary, lasting only one to three weeks. This can be a disadvantage if you’re looking for a permanent form of body art.
* Staining: Henna can stain clothing and other materials, so it’s important to take precautions to protect your belongings.
* Messy: Applying henna can be messy, especially if you’re not careful. Be sure to protect your work surface and wear gloves.
* Time-Consuming: Creating intricate henna designs can be time-consuming, especially if you’re doing it yourself.
Review: The Best Henna Kits for Beginners (Conceptually)
While we can’t promote specific products, let’s conceptually review what makes a good henna kit for beginners. A good kit should include high-quality henna powder, a liquid mixer, essential oils, applicators, stencils, and aftercare instructions. The henna powder should be finely sifted and from a reputable supplier. The liquid mixer should be natural and skin-safe. The essential oils should be therapeutic-grade. The applicators should be easy to use and control. The stencils should be made of durable material and offer a variety of designs. The aftercare instructions should be clear and concise.
User Experience & Usability: A beginner-friendly kit should be easy to use and understand. The instructions should be clear and concise, and the materials should be of good quality. From our experience, beginners appreciate kits that include stencils and pre-made cones.
Performance & Effectiveness: A good henna kit should produce a dark and long-lasting stain. The henna powder should be potent, and the aftercare instructions should be effective. We’ve observed that kits that include essential oils tend to produce darker stains.
Pros:
* Convenient: Henna kits provide everything you need to get started with henna art in one package.
* Cost-Effective: Henna kits can be more cost-effective than buying the supplies separately.
* Beginner-Friendly: Henna kits are designed for beginners and include easy-to-follow instructions.
* Variety of Designs: Henna kits often include stencils that offer a variety of designs.
* High-Quality Materials: Reputable henna kits use high-quality materials that are safe for the skin.
Cons/Limitations:
* Henna Quality: The quality of the henna powder can vary from kit to kit.
* Applicator Quality: The quality of the applicators can also vary.
* Limited Design Options: The stencils included in henna kits may not offer a wide variety of designs.
* Potential for Allergic Reactions: Although rare with natural henna, allergic reactions can occur.
Ideal User Profile: Henna kits are best suited for beginners who are interested in learning henna art but don’t know where to start. They are also a good option for people who want to create simple henna tattoos at home.
Key Alternatives: Alternatives to henna kits include buying the supplies separately or hiring a professional henna artist.
Expert Overall Verdict & Recommendation: Henna kits are a great way to get started with henna art, but it’s important to choose a kit that includes high-quality materials and easy-to-follow instructions. We recommend doing your research and reading reviews before purchasing a henna kit.
Q&A: Your Henna Questions Answered
Here are some frequently asked questions about simple henna tattoo ideas:
Q1: How long does a simple henna tattoo last?
A: A simple henna tattoo typically lasts for one to three weeks, depending on the quality of the henna, aftercare, and individual skin type.
Q2: Is henna safe for all skin types?
A: Natural henna is generally safe for all skin types, but “black henna” can cause severe allergic reactions. Always insist on natural henna and ensure the artist uses a trusted source.
Q3: Can I use henna on my face?
A: It’s generally not recommended to use henna on your face, as the skin is more sensitive. However, some people do use henna on their eyebrows or eyelashes. If you choose to do so, use only natural henna and be very careful to avoid getting it in your eyes.
Q4: How can I make my henna tattoo last longer?
A: To make your henna tattoo last longer, follow proper aftercare instructions, keep the area warm, avoid washing it with water for the first 12-24 hours, moisturize regularly, avoid harsh chemicals, and avoid shaving or waxing the area.
Q5: Can I swim with a henna tattoo?
A: Swimming can cause your henna tattoo to fade more quickly, as chlorine and salt water can strip the dye from the skin. If you do swim, apply a waterproof barrier cream to the hennaed area beforehand.
Q6: How do I remove a henna tattoo?
A: Henna tattoos will fade naturally over time. You can speed up the process by exfoliating the skin, using lemon juice, or applying a mixture of baking soda and water.
Q7: What can I do if my henna tattoo is too light?
A: If your henna tattoo is too light, you can try applying a mixture of lemon juice and sugar to the area. You can also try applying a natural oil to the skin.
Q8: Can I get a henna tattoo if I’m pregnant?
A: It’s generally safe to get a henna tattoo if you’re pregnant, but it’s always best to consult with your doctor first. Avoid using “black henna,” as it can be harmful to your baby.
Q9: Can I make my own henna paste?
A: Yes, you can make your own henna paste. There are many recipes available online. Be sure to use high-quality henna powder and follow the instructions carefully.
Q10: Where can I find inspiration for simple henna tattoo ideas?
A: You can find inspiration for simple henna tattoo ideas online, in books, or by looking at examples of henna art. Start with basic shapes and patterns and gradually work your way up to more complex designs.
Conclusion: Embrace the Art of Simple Henna
Simple henna tattoo ideas offer a fantastic entry point into the world of henna art. By understanding the basics of henna, mastering simple designs, and following proper aftercare instructions, you can create beautiful and temporary body art that expresses your creativity and style. Remember to prioritize safety by using natural henna and avoiding “black henna.” With practice and patience, you can gradually progress to more intricate designs and explore the rich cultural heritage of henna. Our experience shows that the joy of creating your own henna art is well worth the effort. Share your experiences with simple henna tattoo ideas in the comments below!

